Reverse Outlines: “Finding” your story during revisions
Dear reader,
Most writers think of outlines as a pre-writing tool but, just like any other tool, they can be created at any point in the writing process—even after the story’s been written. Most often, post-draft outlines are referred to as reverse outlines. It’s easy to get lost in a first draft, even with an outline. Reverse outlines are a great way to “find” your plot after your first draft is done.
This post will discuss (1) what I think are the benefits of these outlines and (2) how they helped me get my first draft down to 140k words from 297k! If you’re someone who finds visual references more helpful, feel free to scroll down to the IN PRACTICE session :) But, to start off…
WHAT is a reverse outline?
At first glance, it seems a whole lot like an outline. But think about it this way: just like it’s easier to edit something on the page, it’s also easier to create an in-depth outline of a story after you’ve written it. First drafts are like a jumbled puzzle. You’ll have a lot of the pieces by the time you’re done writing, but you’ll have to re-slot some (or a lot) into the correct places. A reverse outline is an outline you write after the first draft to figure out how every scene fits into the overarching story. Consider: is that puzzle piece even necessary to the puzzle? Can you throw it out? Or, can you reshape it to fit?
Usually, a reverse outline will include:
Chapter titles
Every important scene in that chapter
A “key” that you can refer to when figuring out how to mark up your outline
I have an example of what mine looks like in the IN PRACTICE session, but format your reverse outline however you like! The important thing is that it lists out the major scenes from every chapter. That way, when you jump into revisions, you’ll be able to refer to a document that gives you all the important details in one place rather than having to search for them in the longer manuscript doc.
WHEN do you recommend creating a reverse outline?
I recommend creating a reverse outline after you’re done with a first draft but before you send it out to beta readers. I think it’s best to edit a story to the best of your abilities before you get another opinion on it. Sending out your best (at the time) work will ensure that the revision suggestions you’re getting won’t echo edits you already anticipate making. It will cut down on a lot of future work.
I also like to personally step away from first drafts after I finish them—usually for at least two weeks—before jumping into a reverse outline. It may seem counterproductive but returning to a story after some time away allows you to reread it with fresh eyes.
Here’s a breakdown of what my own revision timeline looks like:
Finish my first draft
Spend some time away from the manuscript (and celebrate finishing!)
Write a reverse outline while rereading first draft
Create a fresh NEW outline for the second draft
Write a second draft based on my edits (I do multiple rounds of revisions before it’s “complete”)
Send to beta readers!
Edit based on [relevant] beta reader feedback
Repeat process as many times as it takes for the story to feel “finished”
HOW do you compose a reverse outline?
Just like with a normal outline, the level of detail in a reverse outline is wholly up to you! But here’s some advice:
Be as detailed as you can.
Write your reverse outline while rereading your first draft. Writing the outline while rereading will allow you to think critically about each chapter in the moment, which will give you some great in-context notes for later, when you’re trying to review the story as a whole.
Use bullet points beneath chapter headings for your main scenes.
Make notes on your manuscript as you reread. A reverse outline is extremely helpful for figuring out bigger changes, but taking notes on the actual manuscript is going to help a lot when you’re rewriting and trying to figure out where the edited content needs to go.
Think big AND small. As you go through and write your scenes, ask yourself: “Does this plot point contribute anything to my plot/setting/characters arcs?” It can be really hard to let go of content we love, but revising is the best time to consider pacing. If there’s anything extraneous in your story—a fun scene that’s unrelated to the plot, a random character quirk that never comes up again, a location that doesn’t reappear—think about cutting it down or out, OR find a way to reframe it so that it does contribute something meaningful to your story.
There is no right or wrong way to write a reverse outline! Here’s the format I used for mine:
[STORY TITLE] REVERSE OUTLINE
Key: This is where you decide how you’re “marking” up your outline for later interpretation. Are you going to cross out scenes that need to be deleted for your second draft? Will you highlight scenes if they contain a plot hole that needs to be solved? Try to come up with shortcuts/colors that are intuitive to you!
Chapter Number + Description: I cannot stress enough how important it is to number your chapters! If you have chapter titles in your manuscript, include them here! If you’re like me and don’t have chapter titles, include a VERY brief description. Believe me, it will be a lot easier to read your reverse outline if you include context.
Scene 1: Write out all important scenes for your chapter. I recommend using bullet points!
Scene 2
Scene 3
Chapter Remarks: This is something I like to do that really helps me. After I’m done writing out my scenes, I include notes and questions on that specific chapter for Future Me.
[Repeat this format until the last chapter]
WHO would benefit from writing a reverse outline?
I don’t do any planning before I jump into a story, and so find reverse outlining extremely helpful. But I think, no matter how much planning you do, it’s worth trying these out if you don’t know where to start with revisions!
IN PRACTICE: REVERSE OUTLINING MY MANUSCRIPT
I’m a pantser and an overwriter. When I finished the first draft of THE STARDUST THIEF, it was 297k words. I was terrified to jump into edits knowing so much would have to be cut, and that’s where a reverse outline really helped me. With it, I was able to cut my story down from 297k words to 143k. And then, after multiple rounds of beta reader feedback, I got it to 122k. I signed with an agent at that word count :) So, all of you over writers out there: don’t fear! You can cut your manuscript down. And if you’re someone who underwrites your first draft and is looking to add more, a reverse outline might show you where and when you can expand.
With screenshots, I’m going to talk a little bit about how I formatted my own reverse outline. I hope you find the visuals helpful :)
First, here’s the beginning of my reverse outline—my revision key:

I constantly referred to this key as I was plotting my outline. It helped me see, at a glance, how much editing each chapter would need.
Here’s a visual example of what the key looks like applied to the outline:

Behold: revision chaos!
No, but seriously—this is basically what my reverse outline consisted of: a series of mini-chapter outlines. Let me give you a quick rundown of why I included what I did:
Chapter Title/Character POV: I numbered each chapter and included a brief description. Also, since I always write more than one POV into my stories, I included the POV character(s) beneath the chapter title.
The scenes: Because my story was so long, I tried boiling all events down to 3-5 bullet points. Unless it was extremely important to the plot, I left out things like characters wandering from Point A to B, or thinking about things.
General Chapter Remarks: After I finished writing out the scenes for a chapter, I stopped and brainstormed—with myself. I personally find it really helpful to bombard Future Me with questions :’)
So, what happened here? See all that crossed out content? All of that was deleted from the second draft. Those POV characters—Zahra and Ramid—I loved them, but as I went through my reverse outline and crossed out their scenes I realized they weren’t necessary to the story. So, I cut them out. (Talk about killing your darlings!) The only piece of plot I retained from this chapter is the bit in red, which ended up being completely overhauled in the next draft.
Here’s another example from my reverse outline:
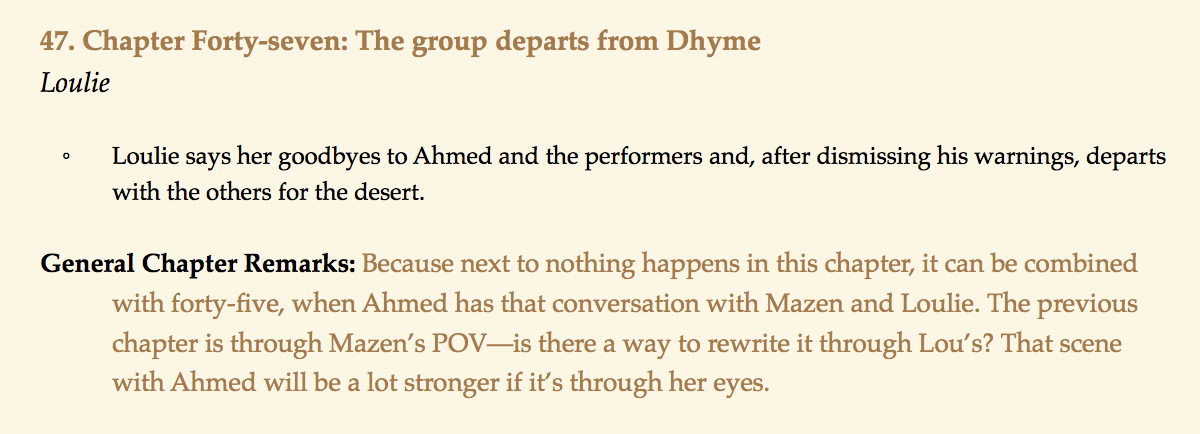
Phew, no spoilers here!
Anyway, here’s an example of how the reverse outline helped me merge content. After outlining this chapter, I realized it didn’t need to exist. There was only a single scene—and it was somehow 12 pages?? Yikes! So I decided to cut it down significantly and combine it with the previous chapter.
What happened AFTER the reverse outline?
My reverse outline was basically a roadmap. A very messy roadmap, but a much easier way to look at my story as a whole. After finishing it, I had a much stronger idea of what my story was. My first drafts are very exploratory; I often overwrite to figure out the characters and world. The reverse outline helped me cut elements that didn’t add anything to the plot.
This blog post is already running long so I’m going to skim these next details, but I’m happy to expand on the revision process in the future if anyone would find it helpful :)
Other things I did during this round of revisions:
I used a program called Scrivner to organize additional notes while I was writing my reverse-outline. These notes were about specific things I wanted to keep track of in the story. For instance, I had one document called “Location descriptions,” another called “Traveling Gear” (so I could figure out when/where the characters picked up and lost important items), and a “Memories” document where I kept track of flashbacks (with page numbers). The last document was helpful because it helped me figure out which memories were actually important to the plot. I ended up cutting 80% of my flashbacks in my second draft.
After compiling my notes, I wrote a full second draft outline. It was basically my reverse outline but with all the crossed out content gone and with additional edits + extra scenes. So, my reverse outline helped me figure out what needed to be added/deleted—and the the second draft outline is what I used for reference when I started my rewrite :)
I rewrote my second draft on a new document. I know everyone has their preferences, but my brain hits a roadblock when I paste old content into a new document, so I started fresh! I kept my old document open and, going chapter by chapter, slowly rewrote the entire story, constantly looking between my second draft outline and first draft.
IN CONCLUSION:
Revising is hard work and, like writing, there is no right way to do it. Reverse outlines are just one of many tools you can use to figure out what’s working in your work and what isn’t. They don’t work for everyone—just like outlines don’t work for everyone!—but if you need a way to “find” your story, they’re a great tool to try. I can’t imagine revising without them!
If you have any questions, please feel free to reach out. Revising is hard, but it’s also incredibly satisfying!
— Chelsea